Considering the evolving landscape of virtualization technologies, many users are opting to migrate their Xen VPS instances to KVM servers. This shift is driven by the desire for a more cost-effective and efficient hosting solution, as KVM servers have gained popularity for their lower maintenance costs and enhanced performance. I’ve personally managed the migration of VPS from Xen to KVM in my organization and can provide clear steps to achieve it. Please note that while these instructions are tailored to the SolusVM control panel, they can be adapted for other control panels too with minor variations.
Step 1: Connect to the Xen Node via SSH
Begin by establishing an SSH connection to your Xen node. Access to the Xen server hosting your VPS is essential.
Step 2: Find the VPS Root Image
Locate the path to your VPS root image configuration:
cat /home/xen/vmID/vmID.cfg | grep ^disk | awk -F '= ' {'print $2'} | awk -F ',sda1' {'print $1'} | awk -F ':' {'print $2'}
For example:
cat /home/xen/vm15251/vm15251.cfg | grep ^disk | awk -F '= ' {'print $2'} | awk -F ',sda1' {'print $1'} | awk -F ':' {'print $2'}
/dev/vps/vm15251_img
Step 3: Create a VPS Backup and Transfer
Generate a backup of your VPS and transfer it to the destination KVM node using tools like dd or rsync. Replace path-to-image with the image path from step 2 and DESTINATION_IP with the IP address of the destination KVM node. You’ll need to enter the root password for the destination KVM node.
dd if=path-to-image of=/image.img bs=4096k
rsync /image.img DESTINATION_IP:/root
Step 4: Create an Empty VPS on the KVM Node
On the destination KVM node, create an empty VPS, and ensure you assign an additional 2GB of storage to the new VM. This extra storage allocation helps prevent potential issues during the migration.
Step 5: Connect to the KVM Node via SSH
Connect to the KVM node using SSH.
Step 6: Find the Image Path on the KVM Node
Identify the image path of the newly created VPS on the KVM node:
virsh domblklist kvmID
For example:
virsh domblklist kvm101
Step 7: Prepare the KVM VPS LVM Image
Open the KVM VPS LVM image with the fdisk utility to create a partition matching the size of the Xen VPS disk:
fdisk /dev/vps/kvm101_img
Refer to this guide for partition creation instructions: Linux Create Partition
Step 8: Map and Mount the KVM LVM Image
Map the KVM LVM image and mount the partition at /mnt:
kpartx -a /dev/vps/kvm101_img
mount /dev/mapper/vps-kvm101_img1 /mnt
Step 9: Mount the Xen Image
Create a directory /media/source and mount the Xen image from step 3:
mkdir /media/source
mount /root/image.img /media/source
Step 10: Copy the Files to KVM
cd /media/source
rsync -alr ./* /mnt
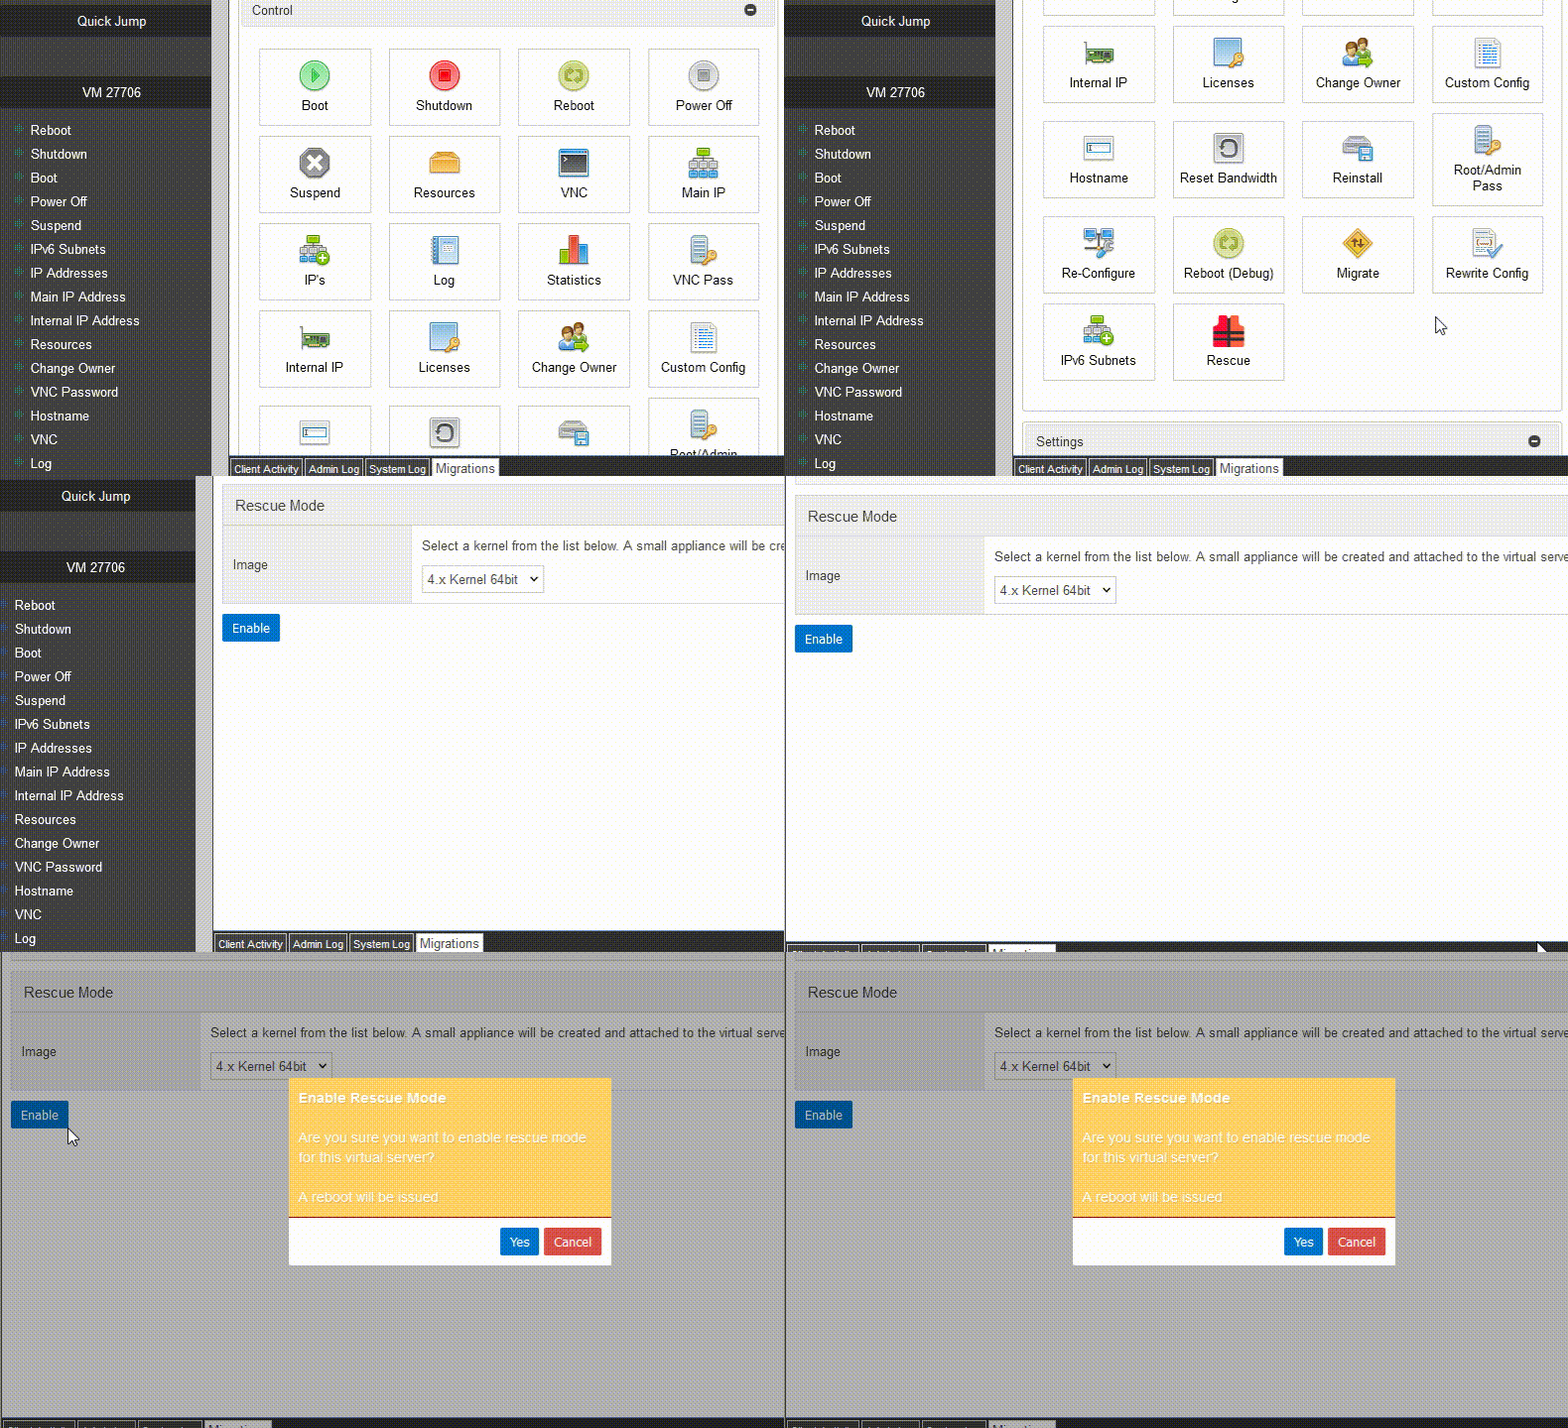
Step 11: Enable Rescue Mode for the KVM VPS and Access it

Step 12: Mount Necessary File Systems
Mount essential file systems within the rescue environment:
mount /dev/vda1 /mnt
mount -o bind /dev /mnt/dev
mount -o bind /dev/pts /mnt/dev/pts
mount -o bind /proc /mnt/proc
mount -o bind /run /mnt/run
mount -o bind /sys /mnt/sys
Step 13: Chroot into the Rescue Environment
Chroot into the mounted rescue environment:
chroot /mnt
Step 14: Update the System
Update the system based on your distribution:
For CentOS/RHEL:
yum update -y
For Debian/Ubuntu:
apt update -y && apt upgrade -y
Ensure that the OS vendor’s kernel is installed.
Step 15: Adjust Configuration
Change /dev/xvdaX references to /dev/vdaX and remove lines related to the swap partition in /etc/fstab.
Step 16: Reinstall Grub
Reinstall the Grub bootloader:
grub-install --force /dev/vda
Step 17: Update Grub Configuration
Depending on the Grub version installed, run the appropriate command:
For Grub:
grub-mkconfig -o /boot/grub/grub.cfg
For Grub2:
grub2-mkconfig -o /boot/grub2/grub.cfg
Step 18: Exit Chroot Environment
Exit the chroot environment by pressing CTRL + D.
Step 19: Unmount Everything
Unmount all mounted directories:
umount /mnt/dev/pts
umount /mnt/dev
umount /mnt/proc
umount /mnt/run
umount /mnt/sys
umount /mnt
With these steps completed, you can now start your KVM VPS on the destination node, successfully migrating from Xen to KVM.
