This guide is the easiest way to share files and folders over the network between Windows 10 or Windows 11 devices on the internet. Through this guide, I have clarified each process and the importance of each step to ensure a smooth experience for you to set up network sharing with Windows computers easily.😉
1. Configure Advanced Sharing Settings
We first need to enable network discovery and file-sharing features to share files and folders in Windows 10 or 11. These settings allow your computer to communicate with other devices on the same network.
- Search for Control Panel in the Windows search bar and open Control Panel.
- Select Network and Sharing Center. If you can’t find it, click “View by Category” and switch to small icons.
This is the central location for enabling network-related settings in Windows!!

- In the left-hand menu, click Change advanced sharing settings.
- Expand the Private section.
- Turn on Network Discovery.
- Turn on File and Printer Sharing.
- Expand the Guest or Public section.
- Turn on Network Discovery.
- Turn on File and Printer Sharing.
- Expand All Networks.
- Turn off Password-Protected Sharing and enable Public Folder sharing if there is an option.
- Click Save changes and close the window. (In Windows 11, there is no option to save changes; simply close the window after completing the steps above.)
Enabling these settings ensures that your computer can discover other devices and share files without a password.

2. Share the Folder
Next, we configure the folder to be shared and set permissions for other users to access it.
- Right-click on the folder you want to share.
- Select Properties.
This step allows you to access the folder’s sharing options.

- Go to the Sharing tab.
- Click Advanced Sharing.
- Check the box for Share this folder.
- Click Permissions to assign access rights (Read, Change, or Full Control).
- Click OK to save.
Sharing the folder and setting permissions ensures that only authorized users can access it.

- On the Sharing tab, click Share.
- Choose the people or groups to share the folder with.
- Assign the desired Permission Level (Read/Write).
- Click Share, then Done.
This step ensures that specific users can access the shared folder based on the permissions you set.

3. Enable Required Services
Some Windows services are essential for network sharing. Here’s how to ensure they are running:
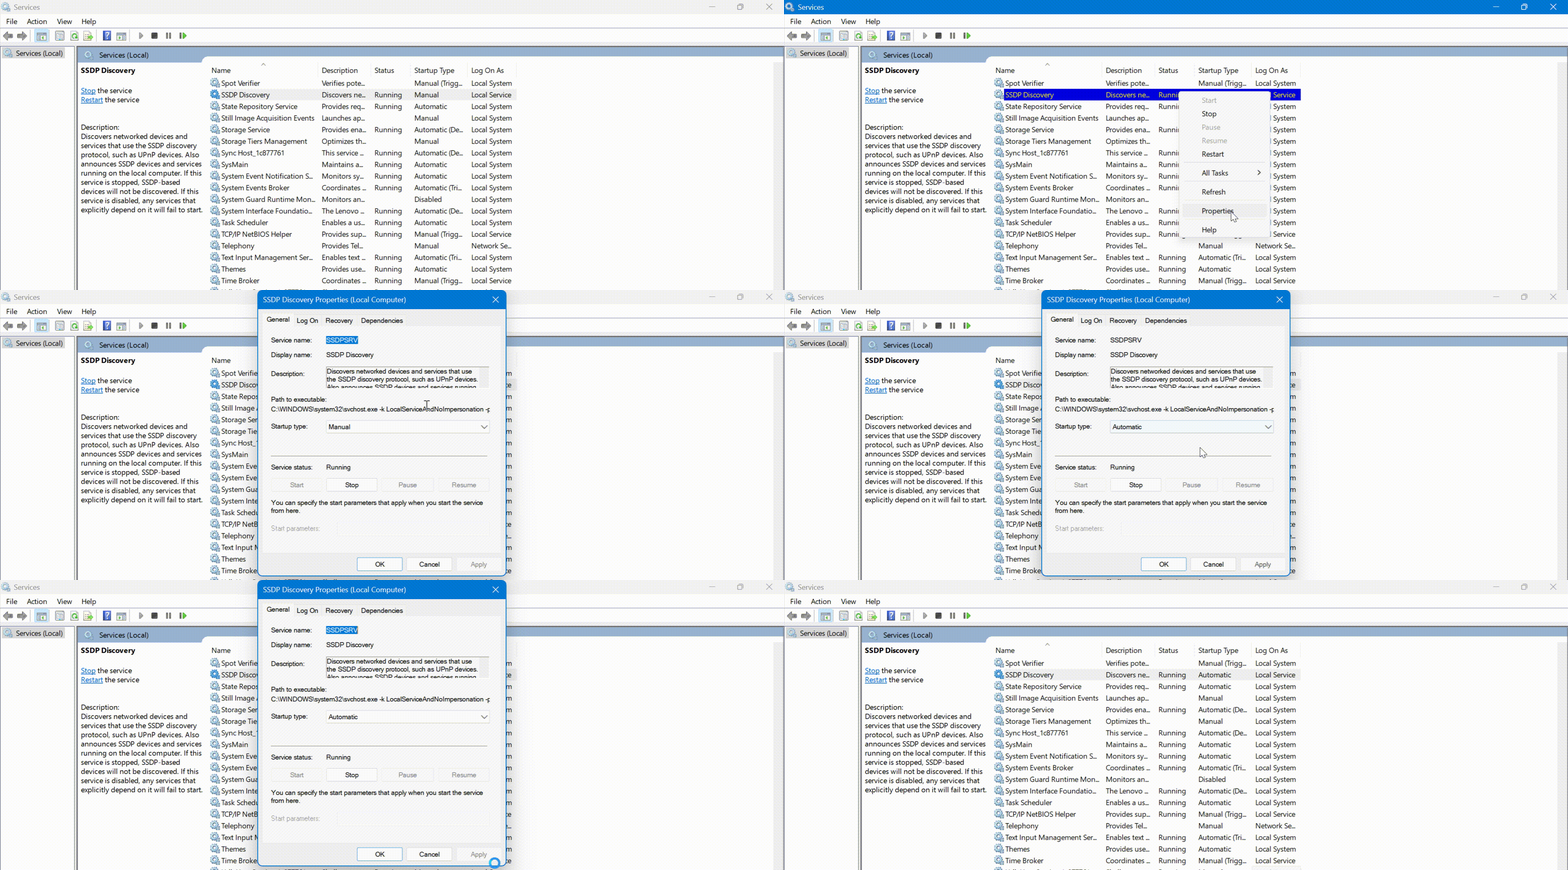
- Press Windows + S and search for Services.
- Open the Services app.
The Services app lets you manage background processes required for sharing to work.
- Find SSDP Discovery, right-click, and select Properties.
- Set Startup type to Automatic, then click Apply and OK.
- Repeat this process for:
These services ensure proper communication between devices on the network.

4. Execute Additional Commands
To refresh system bindings and check for any underlying issues, we need to execute some commands in the Command Prompt.
- Click the Start menu and type “cmd.
- Select Command Prompt from the search results.
Command Prompt allows us to execute system-level commands to verify and repair issues.

- Run the command cls –refresh to clear and refresh the Command Prompt.
cls --refresh- Run the command sfc /scannow to scan and repair system files.
sfc /scannow- Run the command chkdsk to check the disk for errors.
chkdsk- Run the command sfc /scanfile=c:\windows\system32\ieframe.dll to scan a specific file for issues.
sfc /scanfile=c:\windows\system32\ieframe.dll- Run the command sfc /verifyfile=c:\windows\system32\ieframe.dll to verify the integrity of a specific file.
sfc /verifyfile=c:\windows\system32\ieframe.dllThese commands ensure that your system is free from issues that might interfere with file sharing.
5. Verify Shared Folder Accessibility
Finally, check if the shared folder is accessible from other devices on the Windows network share.
- Expand Network in the left-hand pane.
- Ensure the shared folder is visible on other devices.
This confirms that the folder is shared and accessible.
- On another computer, navigate to the shared folder via the network.
- Confirm you can view or edit the files as per the permissions you set.
You can easily share files and folders across your network using Windows’ network sharing feature by following these steps in this blog.
