Are you facing the Windows 11 update error code 0x800705b9?
If so, follow this step-by-step troubleshooting guide, starting with the simplest fixes and progressing to more involved solutions. If one step doesn’t work, move on to the next, as I explain in this solution tutorial for error code 0x800705b9.
- Starting App Readiness Service
- Moving the $WinREAgent Folder
- Running Update Troubleshooter
- Restart Windows Update and Background Intelligent Transfer Service
- Run Windows 11 Installation Assistant
- Checking Microsoft Update Catalog
- Resetting Windows Update Components
- Updating via Media Creation Tool
- Unlock Peak Performance with Expertly Managed AWS Hosting!
Starting App Readiness Service
Sometimes, the App Readiness service is disabled, which can interfere with updates and cause the error 0x800705b9. Let’s ensure it’s running:
- Open the Services application by typing “services” in the Windows search bar.
- Locate App Readiness in the list.
- Double-click it, set the Startup type to Automatic, and click Apply.
- If the Start button is clickable, press it and click OK.

If this doesn’t resolve the error, don’t worry; let’s try the next step.
Moving the $WinREAgent Folder
The 0x800705b9 error code can sometimes happen when the $WinREAgent folder might contain corrupted files. Here’s how you can address it:
- Open File Explorer and navigate to the C drive. (C:\)
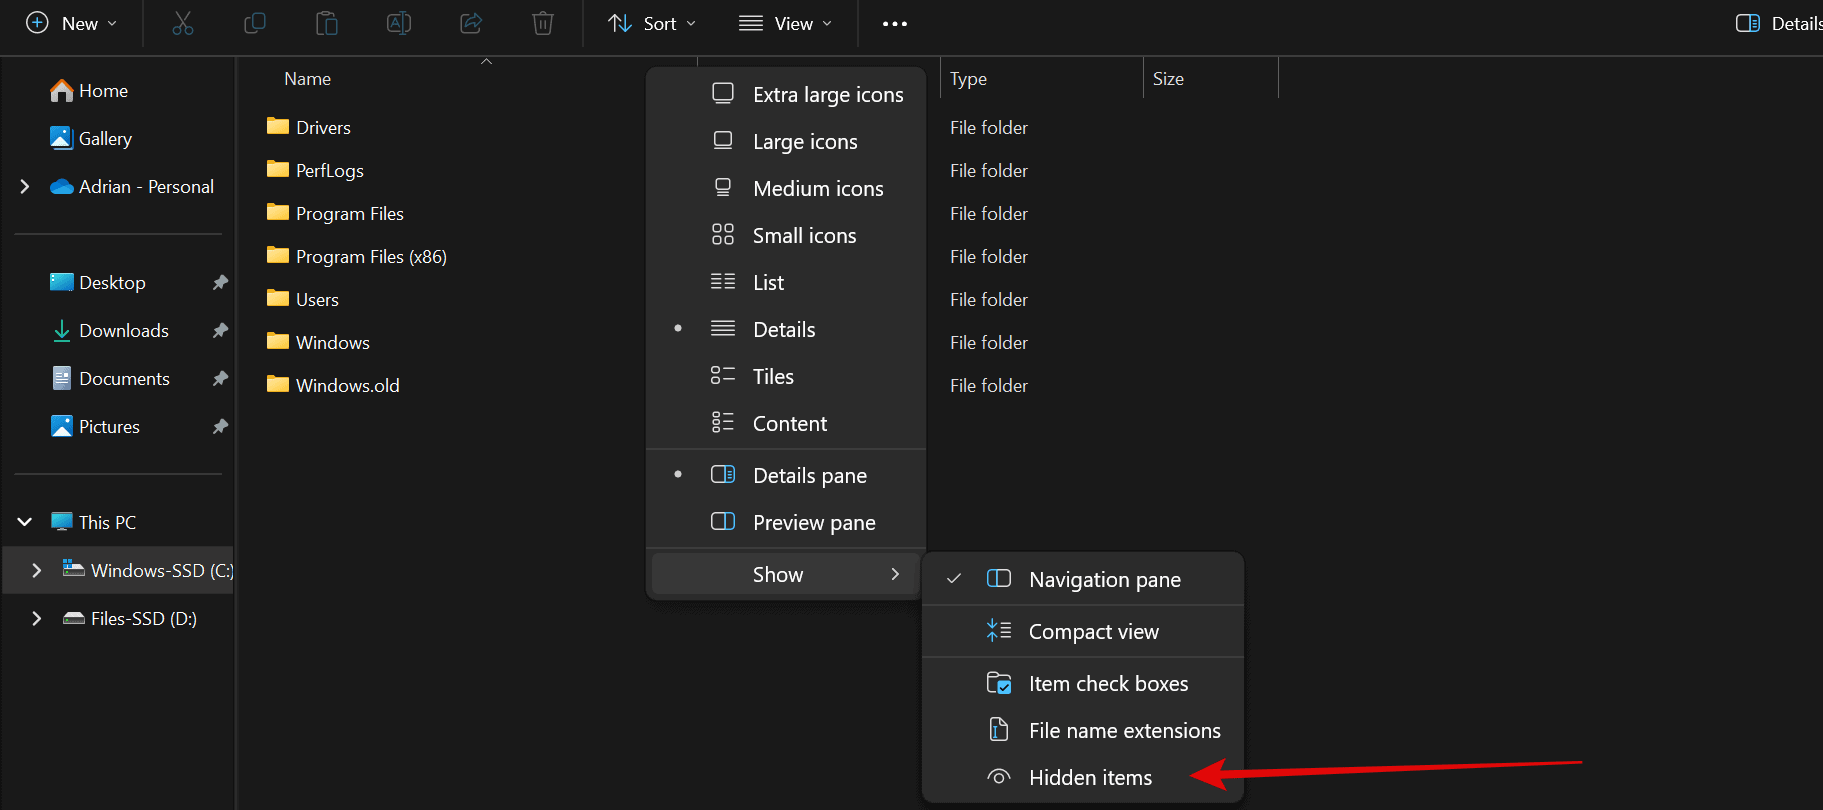
- Enable hidden items via View > Show > Hidden items.

- Locate the $WinREAgent folder (if it exists).
- Copy the folder to your desktop for backup.
- Delete the original folder from the C:\ drive.
Is it safe to delete the $WinREAgent folder?
Yes, you can safely delete the $WinReAgent folder created during Windows updates.
Reference: https://www.easeus.com/knowledge-center/what-is-winreagent-folder.html
If the error persists, let’s continue troubleshooting by running the inbuilt Windows Update troubleshooter.
Running Update Troubleshooter
Windows has a built-in troubleshooter that can automatically detect and fix update issues:
- Go to Settings > System > Troubleshoot > Other troubleshooters.
- Locate Windows Update and click Run.
- Follow on-screen instructions and restart your computer if needed.

Did this step help? If not, let’s move on. 😉
Restart Windows Update and Background Intelligent Transfer Service
Restarting these services can often resolve update problems. Here’s how:
- Open Services again. (As we did in the first step: Starting App Readiness Service.)
- Locate Windows Update and set its Startup type to Automatic. Click Apply, then Start if available.

- Repeat the steps for Background Intelligent Transfer Service (BITS).

If the issue still lingers, don’t give up yet; there are more solutions to try.
Run Windows 11 Installation Assistant
When built-in update methods fail, the Windows 11 Installation Assistant can help:
- Visit the Windows 11 Installation Assistant.
- Download and run the tool.
- Follow the on-screen instructions to update your system.

If this method isn’t helpful, check the Microsoft Update Catalog.
Checking Microsoft Update Catalog
This method allows you to manually install the problematic update:
- Open the Microsoft Update Catalog.
- Search for the update using its KB number.
- Download the appropriate version (e.g., x64, x86) and manually install it.

If this doesn’t work, try resetting Windows Update components!
Resetting Windows Update Components
Sometimes, resetting update components is necessary to fix error code 0x800705b9. Let’s automate this process:
- Open Notepad and paste the following commands:
SC config trustedinstaller start=auto
net stop bits
net stop wuauserv
net stop msiserver
net stop cryptsvc
net stop appidsvc
Ren %Systemroot%\SoftwareDistribution SoftwareDistribution.old
Ren %Systemroot%\System32\catroot2 catroot2.old
regsvr32.exe /s atl.dll
regsvr32.exe /s urlmon.dll
regsvr32.exe /s mshtml.dll
netsh winsock reset
netsh winsock reset proxy
rundll32.exe pnpclean.dll,RunDLL_PnpClean /DRIVERS /MAXCLEAN
dism /Online /Cleanup-image /ScanHealth
dism /Online /Cleanup-image /CheckHealth
dism /Online /Cleanup-image /RestoreHealth
dism /Online /Cleanup-image /StartComponentCleanup
Sfc /ScanNow
net start bits
net start wuauserv
net start msiserver
net start cryptsvc
net start appidsvc- Save the file as Wufix.bat.
- Right-click the file and select Run as Administrator.
- Wait for the process to complete, then restart your PC.

If this still doesn’t solve the issue, we’ve got one more approach to try.
Updating via Media Creation Tool
This is the last step and often the most effective:
- Download the Media Creation Tool from Windows official site.
- Run the tool, select Create installation media, and save the ISO file.
- Mount the ISO and run setup.exe.
- Follow the prompts to update your system while keeping your files and apps.
By now, your issue should be resolved. If it isn’t, you may want to contact Microsoft Support for further assistance.
For a hassle-free experience, consider Veeble’s Windows VPS. It offers a robust platform for running Windows applications seamlessly.
Try these solutions in sequence to resolve the update error code 0x800705b9. If one method doesn’t work, move on to the next. Hopefully, your issue gets resolved, and you can enjoy the latest Windows 11 updates!
