Switching from Legacy BIOS to UEFI on your Windows system can improve boot speed and security. This conversion doesn’t require reinstalling Windows or losing your data. In this guide, we’ll show you how to do it step by step using the built-in MBR2GPT tool. The process also includes converting the partition style from MBR to GPT without data loss.
A brief overview of my solution.
Using the MBR2GPT tool to convert the partition style from MBR to GPT. Then changing the boot mode in BIOS/UEFI firmware from Legacy BIOS to UEFI. While the process is generally safe if it is done exactly as per this blog, anyway, it is always good to be cautious and backup your data before doing it.
4 Steps to Convert Windows From Legacy BIOS (MBR Partition) to UEFI (GPT Partition)
Step 1: Verify the Current BIOS and Partition Style
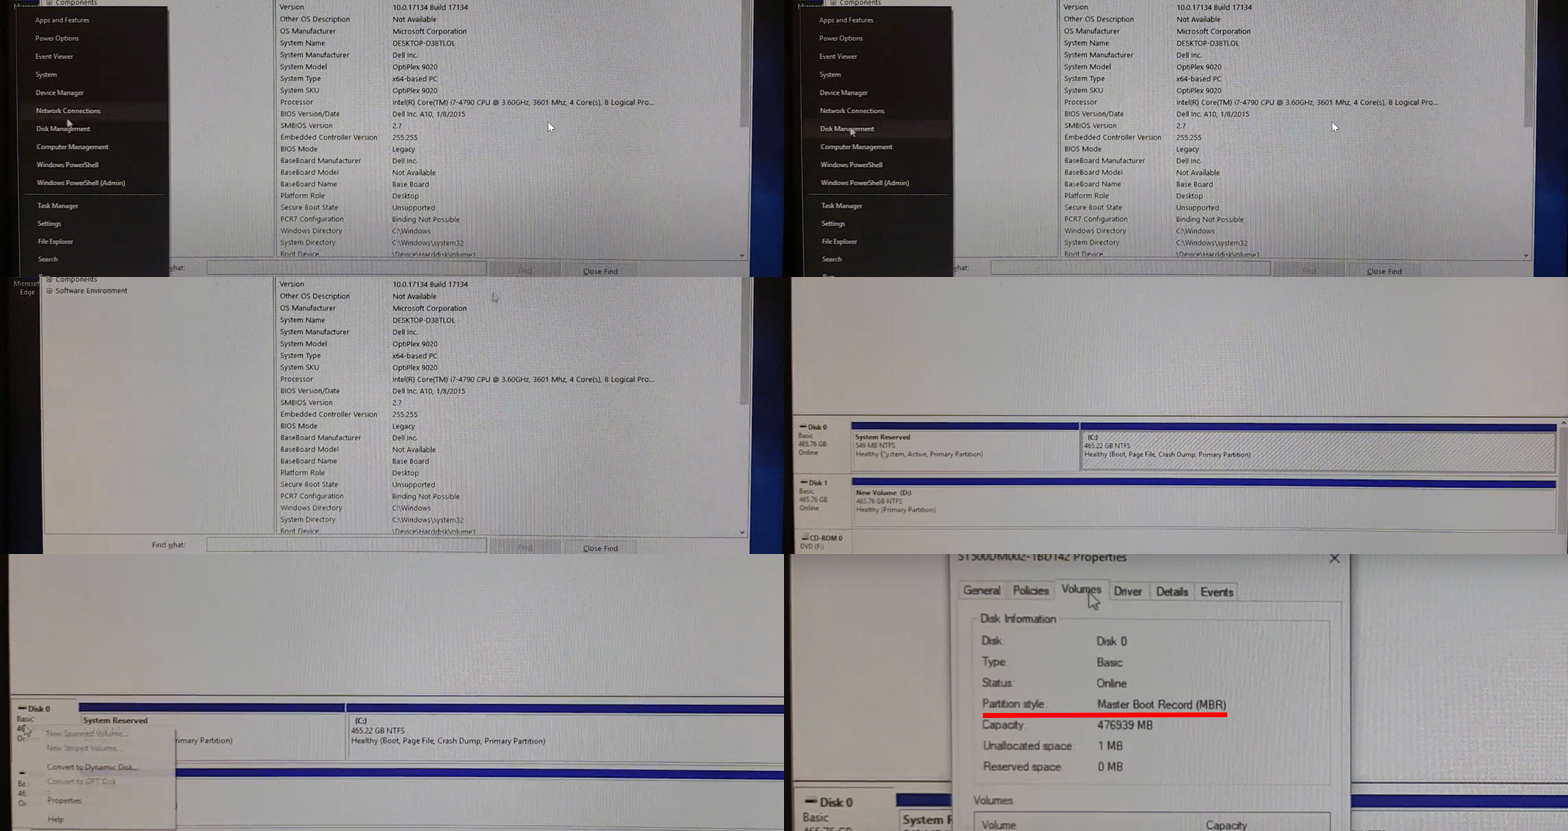
To confirm your system uses Legacy BIOS and an MBR partition:
- Press Win + S and type System Information. Open it.
- Look for the entry BIOS Mode. If it says Legacy, your system is in Legacy BIOS mode.

- Press Win + X, then select Disk Management.
- Right-click your system drive (usually Disk 0) and select Properties.
- Under the Volumes tab, check the Partition Style. If it says Master Boot Record (MBR), you’re using an MBR partition.

Step 2: Convert Disk from MBR to GPT
The MBR2GPT tool will handle this conversion without any data loss.
- Open Command Prompt in administrator mode.
- Press Win + S, type cmd, right-click it, and choose Run as Administrator.
- Run the following command to validate your disk:
mbr2gpt /validateThis checks if your disk meets the requirements for conversion.
- Convert the disk to GPT:
mbr2gpt /convert /allowFullOSThe /allowFullOS switch lets you convert without booting into Windows PE (Preinstallation Environment). The tool will shrink your system partition and automatically create a 100 MB EFI system partition, ensuring no data loss.

If you're looking for a reliable and powerful RDP solution to manage such tasks on remote systems with 24/7 technical support, consider Veeble's Windows RDP.
Step 3: Update BIOS/UEFI Settings
Now that your disk is in GPT format, update your firmware settings to boot in UEFI mode.
- Restart your system and enter the BIOS/UEFI setup:
- Usually, press F2, F12, or Del during startup (this varies by manufacturer).
- Look for Boot Settings or Boot Sequence.
- Change the boot mode from Legacy to UEFI.
- Save changes and exit the BIOS setup.
Accessing BIOS settings with the correct key differs by PC or motherboard, but the boot screen typically shows the key to press at startup. Try searching online for the boot key specific to your laptop model.
Step 4: Verify the Changes
Once your system restarts:
- Open System Information again and check that BIOS Mode is now set to UEFI as we verified using Step 1.

- In Disk Management, confirm that your disk partition style is GPT.

If you're still on Windows 7 and want to upgrade to Windows 10 in UEFI mode:
1. First, perform an in-place upgrade to Windows 10.
2. Then, follow the steps in this guide to convert from Legacy BIOS to UEFI.
That’s it! You’ve successfully converted your Windows system from Legacy BIOS to UEFI without losing data. This process improves system performance and security. If you have any questions, feel free to reach out.