Hi all,
Storing our data with a third-party server or storage place has been always a concern. We used to save our personal as well as company or organization-related data with storage space providers like Dropbox, Google Drive, Outlook drive, etc. They provide security for our data but sometimes we need to go for their premium service if the storage space we need is large. What if we can use our own server, dedicated, or a VPS to store these data? We will get the UI much similar to any other service provider as well.
What is ownCloud?
ownCloud is a web application that can store and serve content from a centralized location or server, it is much like using Dropbox or Google drive to store and retrieve data. The difference is that ownCloud 7 allows us to host the serving software on our own machines, taking the trust issues out of putting your personal data on someone else’s server.
How to Install ownCloud on CentOS?
Installing ownCloud on the server is very easy, we can do it with the help of yum after having the required rpm’s installed on the server.
Recommended Setup for Running ownCloud
For the best performance, stability, support, and full functionality we recommend:
1. Red Hat Enterprise Linux 7
2. MySQL/MariaDB
3. PHP 5.4 +
4. Apache 2.4
The server should have at least 512 MB RAM for the smooth run of ownCloud.
You can check the versions of the above-mentioned packages on the server and install/update them if the server does not meet the requirement. You can install MySQL, PHP, and Apache by following the below methods.
Installing MySQL:
# yum install mysql-server
Then run the below command to set it alive during restarts:chkconfig --levels 235 mysqld on
Start the service:/etc/init.d/mysqld start
Installing Apache:
Below is the command for the installation:yum install httpd
Installing PHP:
yum -y install php
Installing ownCloud:
We will first download the release key associated with the ownCloud software:cd /etc/yum.repos.d/
Add the repo to the system:wget http://download.opensuse.org/repositories/isv:ownCloud:community/CentOS_CentOS-6/isv:ownCloud:community.repo
Then we need to add epel repository too:rpm -ivh http://dl.fedoraproject.org/pub/epel/6/x86_64/epel-release-6-8.noarch.rpm
Finally, update the package database and install ownCloud:yum install owncloud
Configure MySQL for own cloud:
We should configure MySQL for using the ownCloud, please follow the below steps for this:
mysql_secure_installation
Output:[root@veeble ~]# mysql_secure_installation
NOTE: RUNNING ALL PARTS OF THIS SCRIPT IS RECOMMENDED FOR ALL MySQL
SERVERS IN PRODUCTION USE! PLEASE READ EACH STEP CAREFULLY!
In order to log into MySQL to secure it, we’ll need the current
password for the root user. If you’ve just installed MySQL, and
you haven’t set the root password yet, the password will be blank,
so you should just press enter here.
Enter current password for root (enter for none):
OK, successfully used the password, moving on…
Setting the root password ensures that nobody can log into the MySQL
root user without the proper authorization.
Set root password? [Y/n] <– ENTER
New password: <– yourrootsqlpassword
Re-enter new password: <– yourrootsqlpassword
Password updated successfully!
Reloading privilege tables..
… Success!
By default, a MySQL installation has an anonymous user, allowing anyone
to log into MySQL without having to have a user account created for
them. This is intended only for testing, and to make the installation
go a bit smoother. You should remove them before moving into a
production environment.
Remove anonymous users? [Y/n] <– ENTER
… Success!
Normally, root should only be allowed to connect from ‘localhost’. This
ensures that someone cannot guess the root password from the network.
Disallow root login remotely? [Y/n] <– ENTER
… Success!
By default, MySQL comes with a database named ‘test’ that anyone can
access. This is also intended only for testing and should be removed
before moving into a production environment.
Remove the test database and access it. [Y/n] <– ENTER
– Dropping test database…
… Success!
– Removing privileges on test database…
… Success!
Reloading the privilege tables will ensure that all changes made so far
will take effect immediately.
Reload privilege tables now? [Y/n] <– ENTER
… Success!
Cleaning up…
All done! If you’ve completed all of the above steps, your MySQL
installation should now be secure.
Thanks for using MySQL!
Now go to the MySQL prompt and do the below steps:mysql -u root -p
Enter the password and move to the next prompt:CREATE DATABASE owncloud;
Grant access:GRANT ALL ON owncloud.* to 'owncloud'@'localhost' IDENTIFIED BY 'database_password';
Exit from the MySQL:exit
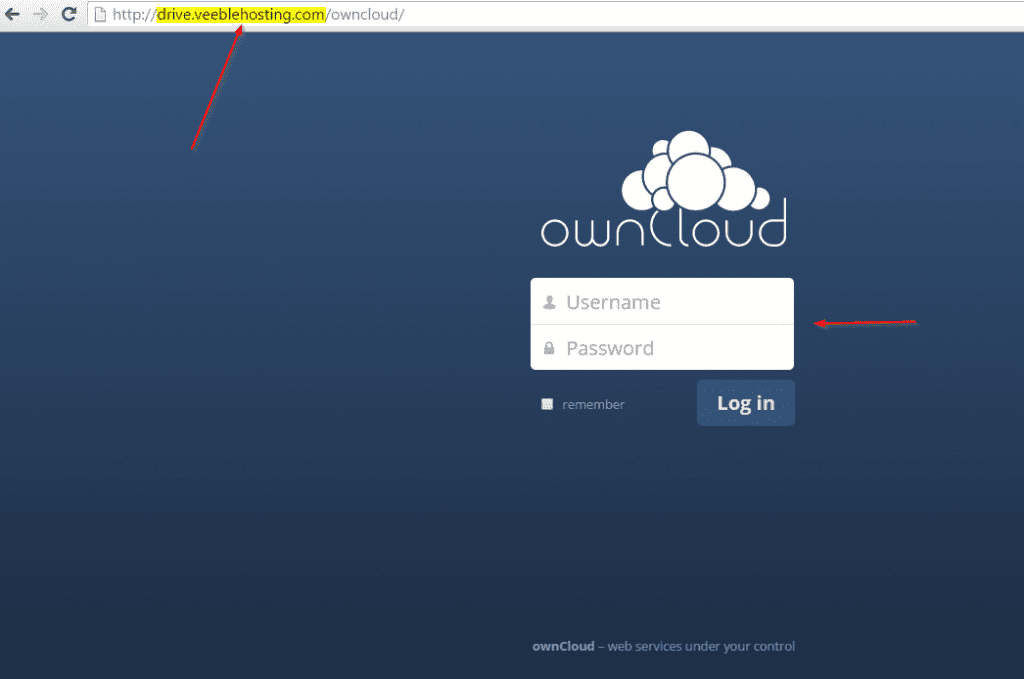
That’s all, now you will be able to access the ownCloud console using the below URL:
http://your_IP/owncloud
You can check the below screenshot to see what it would look like:

Please replace drive.veeblehosting.com in the screenshot with your server IP, thank you!

Awesome post! Keep up the great work! 🙂