Learn how to boost your data security by encrypting your disk in Ubuntu using the Command Line Interface (CLI). This guide is designed for users of all technical levels, especially those who are new to disk encryption.

Preparing Ubuntu for Encryption
General Precaution: It's important to make a complete backup of your data before encrypting it. Eventhough you'll need to format the disk during encryption, erasing all existing data. There's also a risk of mistakenly encrypting the wrong disk or partition, potentially making important data inaccessible, especially if the encryption password is forgotten.
Verify the Disk Space: Make sure your disk has adequate room for encryption. As it organizes and protects your data, the procedure can require more space. To check disk space, use the below command:
df -h
Install the Utility for Encryption
The main encryption method we’re using is LUKS (Linux Unified Key Setup) and the software tool we use to set up encryption with LUKS is cryptsetup.
Check out more on this encryption from the link: https://en.wikipedia.org/wiki/Linux_Unified_Key_Setup
To install the tool cryptsetup, open the Terminal and type:
sudo apt-get install cryptsetupThis installs the necessary tools for encryption. You’re now ready to move on to the next step!
Identify your Disk
Type sudo fdisk -l in Terminal to see all your disks. Pick the one you want to encrypt:
sudo fdisk -lIn this guide, we’ll use /dev/vda3 as the example disk partition for encryption. However, when you follow these steps, remember to replace /dev/vda3 with the name of the disk partition you want to encrypt.

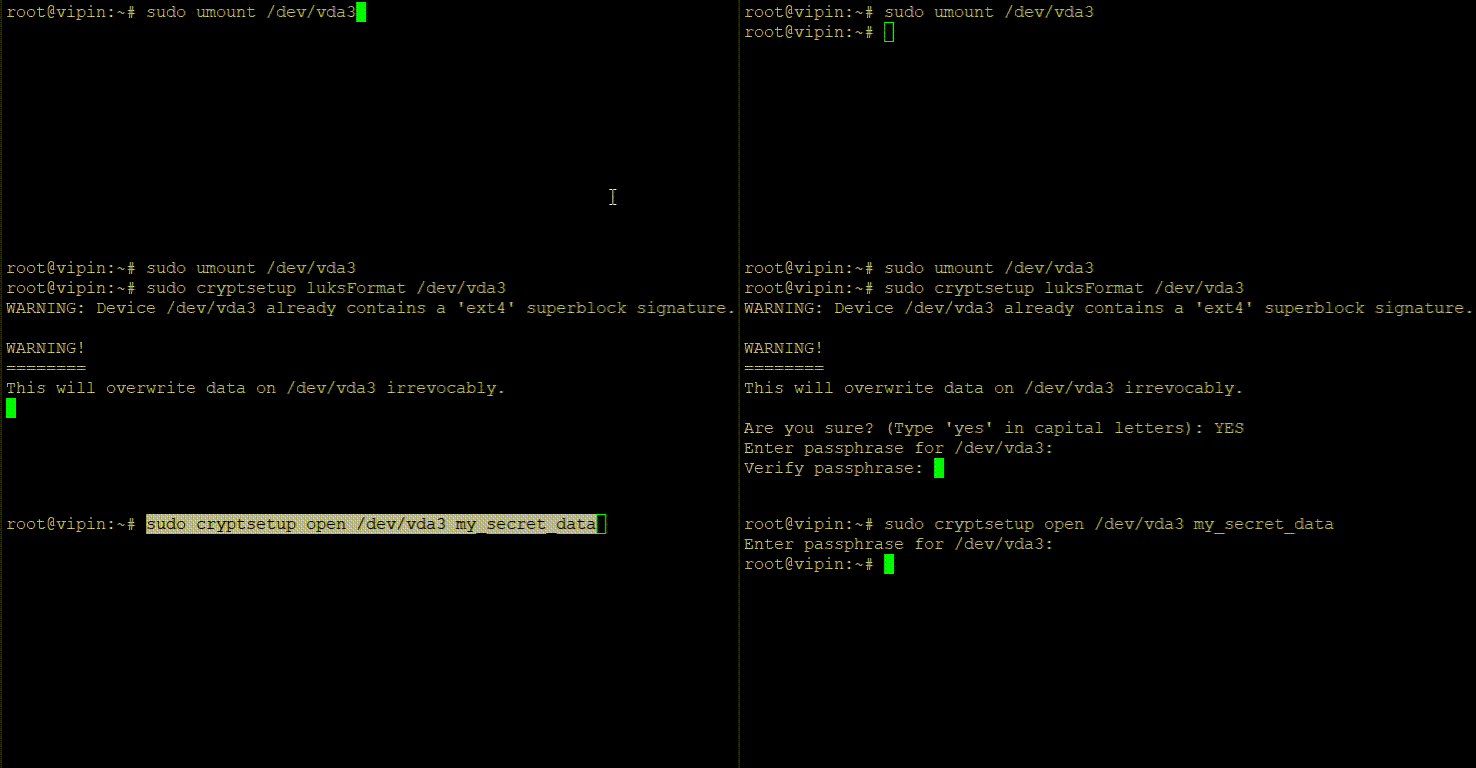
Disk identification has been completed. We are now unmounting that disk partition and proceeding to the encryption phase with the command:
umount /dev/vda3Encrypt with LUKS
Initialize Encryption:
sudo cryptsetup luksFormat /dev/vda3Replace /dev/vda3 with the actual partition, you want to encrypt.
This command initializes the encryption process. You will receive a warning that this action will erase all data on the partition. Confirm by typing YES in capital letters. After confirmation, you’ll be prompted to enter a passphrase. Choose a strong, memorable passphrase, as this will be required to unlock the encrypted data.
Open Encrypted Disk:
cryptsetup open /dev/vda3 my_secret_dataAgain, replace /dev/vda3 with your partition. my_secret_data is an arbitrary name you give to the encrypted device mapper. This name can be anything, but it will be used to identify the encrypted volume in /dev/mapper/.

After this step, the encrypted partition is accessible via a new device-mapper entry located at /dev/mapper/.my_secret_data
Create a Filesystem for the Encrypted Disk
Format the Disk:
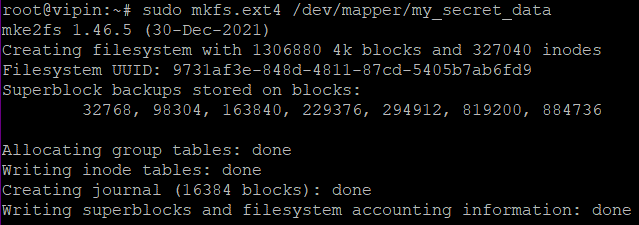
sudo mkfs.ext4 /dev/mapper/my_secret_dataThis command formats the newly created mapped device with an ext4 filesystem. Remember that /dev/mapper/my_secret_data is the name you assigned in the previous step.

Mount the Disk:
sudo mount /dev/mapper/my_secret_data /mntHere, you’re mounting the encrypted volume to a directory (in this case, /mnt). This directory is where you’ll access the files stored in the encrypted partition. Ensure that /mnt is not already in use or choose a different mount point.
Automounting the Disk:
To mount encrypted volumes automatically at boot in a Linux system, you typically need to make entries in both /etc/fstab and /etc/crypttab. If this is not done, the file system will be unmounted when the system reboots. To automatically mount at boot, first you need to identify the UUID of the disks. This can be a bit complex, as it involves identifying the UUID of your encrypted volume and properly configuring the mount options.
To identify the UUID of disks, execute the following command in the terminal:
sudo blkidThis will list all the block devices along with their UUIDs and other information. Look for the entry corresponding to /dev/mapper/my_secret_data. It should look something like this:

The UUID will be the string inside the quotes after UUID=. You can then use this UUID of /dev/vda3 in your /etc/crypttab and UUID of /dev/mapper/my_secret_data in /etc/fstab.
To edit those files you can use editors such as VI or Nano.
An example entry for /etc/crypttab using your UUID:

This tells the system to ask for a passphrase on boot to unlock the partition with UUID a74b33ea-ea47-4da2-8e61-3623fe7a94b6, and make it available as /dev/mapper/my_secret_data. Replace the entries such as UUID and arbitary name of encrypted device (my_secret_data) with your actual values in your files.
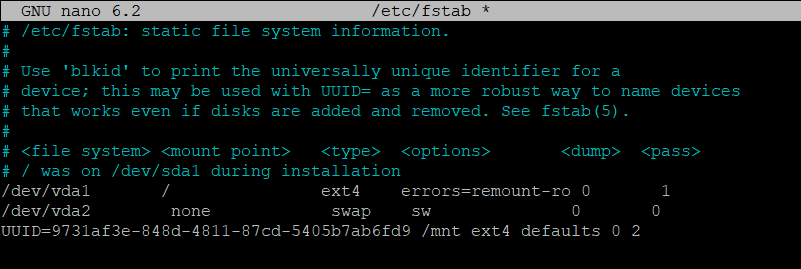
An example entry for /etc/fstab using your UUID:

This mounts the decrypted filesystem (with UUID 9731af3e-848d-4811-87cd-5405b7ab6fd9 from /dev/mapper/my_secret_data) to /mnt (replace /mnt and UUID with your actual desired mount point and UUID).
By setting up both files correctly, during the booting process of your system, the system will prompt the passphrase to unlock the encrypted partition as per the /etc/crypttab configuration. Once unlocked, the system will then automatically mount the filesystem according to the /etc/fstab configuration and ensure that your encrypted data is readily accessible.
Editing /etc/fstab and /etc/crypttab requires care, as incorrect entries can cause boot problems. It’s recommended to have a good understanding of these files or seek guidance if you’re unsure.
Congratulations! We have successfully encrypted the disk. 🥳
